When it comes to home security, Arlo is the first name that comes to your mind. The Arlo security devices are efficient enough to keep an eye on every activity around your premises with great accuracy. However, there are several series and types of Arlo cameras, and one of them is the ‘Floodlight cameras’, which come with brighter, motion-activated floodlights. However, when you buy these security devices, you must be aware of the complete Arlo Pro 3 Floodlight Camera Setup process. If you don’t know this and are interested in learning to configure this device seamlessly, then read this guide thoroughly!
How To Set Up Arlo Pro 3 Floodlight Camera Quickly?
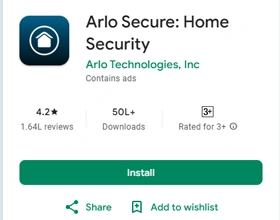
However, most of the Arlo security cameras can be easily set up in two ways, i.e., web browser and Arlo Secure: Home Security app. But, if you own the Arlo Pro 3 floodlight camera, then, you can’t configure it via the web browser.
On the other hand, the user-friendly interface of the Arlo Secure app allows users to seamlessly connect and configure their Arlo floodlight cameras. So, if you want to learn How To Set Up Arlo Pro 3 Floodlight Camera quickly at home, then follow the below instructions. Before that, you must acquire the knowledge to install your security camera. Have a look at the below sections for more details.
Arlo Pro 3 Floodlight Camera Installation Procedure
Before you begin with the camera installation, you must have a good location to place your camera. Additionally, ensure a good and stable internet connection and motion detection. Most importantly, don’t mount your camera directly until the app instructs you to do so. So, let’s begin with the floodlight camera installation:
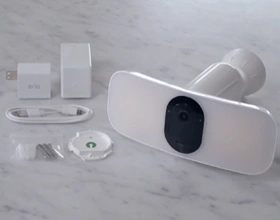
- To begin with, unpack your Arlo camera and all other essential components.
- Then, match the received devices with the items mentioned in the user manual.
- Now, mark and drill the holes in the chosen location to mount the camera.
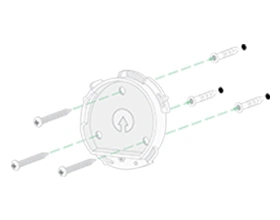
- Using a power drill, screwdrivers, and wall anchors, attach the wallplate to the wall.
- Tighten the screws from the bottom of the wall mount.
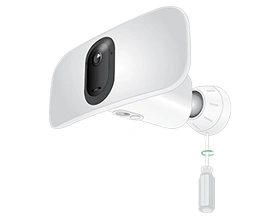
- Now, slide your floodlight camera into the camera housing and adjust its angles.
- Make sure your camera is 8-10 ft. above the ground level and within the wifi router’s range.
- Then, power on your camera and connect it to the wifi router.
- Hereon, the Arlo Pro 3 floodlight camera installation finishes.
- Now, use the Arlo secure app to configure your device settings.
A Stepwise Procedure For the Arlo Pro 3 Floodlight Camera Setup
- Initially, download the Arlo Secure app on a compatible smartphone.
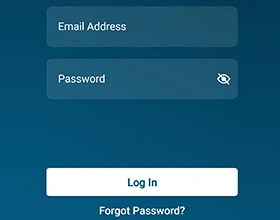
- Now, launch the app and access your Arlo account using valid credentials.
- Hereon, you land the home dashboard of your Arlo app.
- Then, scroll down to the bottom of the screen and tap ‘Add New Device’.
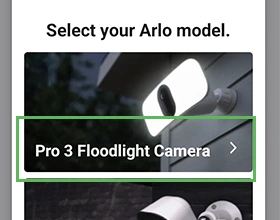
- Now, tap on ‘Lights’ and select the ‘Pro 3 Floodlight Camera’.
- Further, select ‘Connect Without Smarthub’ and tap ‘Continue’.
- After that, check your device is using the 2.4 GHz network band.
- Back to the app and then hit ‘Continue’.
- Now, enter the valid SSID and password and tap ‘Continue’.
- Then, insert the batteries into the camera’s battery compartment and hit ‘Continue’.
- After that, follow the in-app instructions and finally tap ‘Finish’ to end this procedure.
Wrapping Up
In a nutshell, this essential guide comes up with an easy and quick procedure for the Arlo Pro 3 Floodlight Camera Setup. Additionally, you get all the required details and stepwise instructions to install the floodlight cameras through this guide. Hopefully, this guide helped you with the quick installation and setup of your Pro 3 floodlight camera.